Showing posts with label Ethernet Shield. Show all posts

Saturday, May 1, 2010

Arduino Email Manager - Part 1 - Overview

I always seem to start every blog entry moaning about how long it's been since the last project I posted and this one is no exception. I think writing this is pushing me to do more complex projects and what with having a life and all, it just takes a long time to get everything done. This project in particular turned out to be quite a bit more difficult than I thought it would be and it has ended up taking me months and months to work out all the kinks. Because of that, I will be breaking up the project description into a couple of entries. This first one will just introduce the project.

First the obligatory video!


As explained in the video, this project uses three easily available Arduino components to allow you to:

  • See how many emails you have in your POP3 email account
  • Review the "from" and "subject" of your email
  • Delete unwanted emails

Here is what it looks like assembled:


The system is a sandwich of..

  • Arduino Duemilanova
  • Arduino Ethernet Shield
  • DFRobot LCD/button shield (available here from Robotshop among others)

I also used some Shield Stacking Headers (available from Adafruit) since the LCD shield wouldn't clear the Ethernet jack on the network shield. Here it is disassembled:


Getting the LCD Shield to work with the Ethernet Shield was a time consuming process. Initially, it looked like there would be no pin conflicts, since the Ethernet Shield uses pins 10, 11, 12 & 13 and the LCD Shield in theory uses 5,6,7,8 and 9, but for whatever reason I just couldn't make it work. I did finally find a blog posting by David Delabassee (here) that pointed out that, in fact, the LCD Shield uses more pins than is documented and shows how to modify LCD4Bit_mod.cpp to remap the pins slightly. Very useful, but it still seemed to blank out for some reason.

So, I ended up testing every single pin combination (which took hours) and I finally determined that if the LCD Shield was on digital pin 13, it just wouldn't work for whatever reason (even though, in theory, that pin is not used by the shield). So, just bending back that leg on the LCD Shield took pin 13 out of the circuit and it now works fine.

I had also wanted to add in one or two LEDs to signal the message count or connected state, but for whatever reason again when I added them in, it just wouldn't work consistently. If anyone has any ideas on how to fix that it would be appreciated!

As explained in the video, I have used the five buttons available on the LCD shield to page through the emails and delete any that I don't want.


I will post the software in subsequent entries, but for now I will just explain that I decided to go with using a mail "pre-processor" application written in PHP. Originally I wanted to do everything on the Arduino so it would be a complete, stand-alone solution, but, alas, it just proved to be too hard for the Arduino's limited text processing abilities and my small brain. Basically, even with the Duemilanova based on the ATMEGA328, you really can't load a string array with more than a couple of hundred characters before the Arduino locks up. Unfortunately, you need to look through at least the first 1,500 - 2,000 characters to get the "from" and "subject" info I wanted. I looking into using PROGMEM, but I just couldn't get my head around it (looks like all that fancy "pointer" stuff I can never figure out!). Then there's the Arduiniana Flash library, but it seems limited to strings you load at the beginning, rather than dynamic strings.

Finally, I just decided to go with a pre-processor written in PHP. I already know enough PHP to be functional and it is excellent for text processing. When I went to figure out how to do sockets programming with PHP, the first tutorial I found was on writing a script to access a POP3 email server (check it out)! Using a pre-processor isn't cheating too much. Tom Igoe uses one in Making Things Talk for his "Networked Air Quality Meter" project. Of course, on a much vaster scale, that is essentially how the RIM Blackberry email system works - emails are routed through their preprocessor software which compresses and reroutes them them down to the smartphone.

That is enough for now. Next up will be the Arduino software & PHP script.

Thursday, January 21, 2010

Arduino Motion Control over Ethernet

Watching the numbers on Google Analytics definitely tells me my reading public doesn't care about my welding projects! So, let's get back to the Arduino.
When I set up to do my POP3 project, I ended up buying an Arduino Ethernet shield and an Adafruit Ethernet shield plus a Lantronix Xport. Having both, I figured it would be a good challenge to get both talking to each other and the result is this fairly simple project which actually ended up taking a lot of thought. It is loosely based on "Networked Game" project in Tom Igoe's indispensable book "Making Things Talk", but Tom's example does the much harder job of writing everything in the low-level serial commands to the Xport while I am lazy and used the published libraries! The challenge here is that the two network shields have two different Arduino libraries which really don't work quite the same way. Also, the Adafruit library is pretty light on explanation and the examples provided have no comments in the code!
Here is the basic setup of this project, basically the accelerometer on the "server" controls two servos on the "client":

The servos, of course, could be hooked up to any number of things like the X-Y axis of a camera mount or a motion base for a game of some kind. Conceptually, of course, through the magic of the Internet and with the right networking setup, the client could be in New York and the server in Instanbul. Also, through the miracle of standard IP protocols I can use one make of shield to successfully communicate with another using two totally different libraries!
Here is a quick video of the rig in action:
Note that the servos jitter slightly when they are hooked up because of slight variations of the analog readings on the accelerometer. I could probably do some averaging to smooth out the readings to eliminate that jitter.
The Server
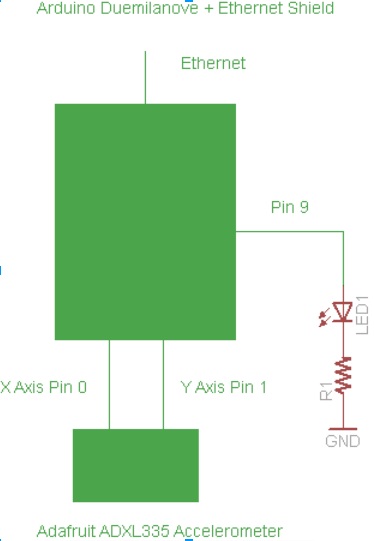
The server is actually very simple. I used the Adafruit ADXL335 accelerometer (info) that is hooked up to the first three analog pins on the Arduino Diecimilia. The Arduino reads and sends out the X, Y and Z axis, but the client only uses the X and Y values because I only have two servos. It would be pretty easy to build support in for all three axes on the client. Apart from the accelerometer, the only other component is the LED that indicates connected or not connected.


The code is equally simple. It reads the accelerometer and when it receives a "g" from the client it prints out the X, Y & Z readings. When it receives an "x" it ends the session. That's it! Note that this uses the Ethernet.h library distributed with the Arduino software.

* Simple Ethernet Server
*
* A simple server that shows the value of the analog input pins 0 - 2 
* which are connected to an ADXL335 Accelerometer.

by Chris Armour, Jan 2010
*/

#include 

byte mac[] = { 0xDE, 0xAD, 0xBE, 0xEF, 0xFE, 0xED }; //Setting the MAC address
byte ip[] = { 192, 168, 0, 177 }; //IP address of the server
int XPin = 0;
int YPin = 1;
int ZPin = 2;
int ValX = 0;
int ValY = 0;
int ValZ = 0;
int ledPin = 9;
char c;

Server server(54321); //This is the port the server listens on.

//==============Setup pins, server & serial ===================//

void setup()
{
Ethernet.begin(mac, ip);
server.begin();
Serial.begin(9600);
pinMode(ledPin, OUTPUT); 
digitalWrite(ledPin, LOW);
}

//=====================Main loop =============================//

void loop()
{
digitalWrite(ledPin, LOW); //If there is no client connected the LED is off.
Client client = server.available();

while (client.connected()) {

if (client.available()) {
digitalWrite(ledPin, HIGH);  
char c = client.read(); //Read one character at a time.
Serial.print("Value received:  ");
Serial.println(c); 

if (c == 'g') { //"g means "get"
ValX = analogRead(XPin);
ValY = analogRead(YPin);
ValZ = analogRead(ZPin);
Serial.print("Value sent:  ");
Serial.print(ValX);
Serial.print(",");
Serial.print(ValY);
Serial.print(",");
Serial.println(ValZ);
client.print(">");
client.print(ValX);
client.print(",");
client.print(ValY);
client.print(",");
client.println(ValZ);
break;
}
if (c == 'x'){ //x means kill the session.
digitalWrite(ledPin, LOW); //turn off the LED
client.flush();
client.stop();
}
}
}
delay(50);
}

The Client

The client is a slightly more complex beast in that it has a switch to initiate a connection, an LED to indicate the connection state and the servos:


The code is also somewhat more involved. Part of that is because of using the AF_Xport library from Adafruit which takes a bit more fiddling, but also because the client needs the extra logic to initiate and disengage the connection. The main problem area is on resetting the Xport which doesn't always seem to want to connect on the first try so I had to build a loop in to retry the reset until it connects. This is a bit inelegant, but it looks like others have had this problem too.

/*
A network client based on Adafruit Ethernet Shield using the 
Xport ethernet-to-serial adapter. It moves servos based on analog
input from a server with an ADXL335 Accelerometer.

by Chris Armour, Jan 2010
*/

#include 
#include 
#include 
#define XPORT_RXPIN 2
#define XPORT_TXPIN 3
#define XPORT_RESETPIN 4
#define XPORT_DTRPIN 5
#define XPORT_CTSPIN 6
#define XPORT_RTSPIN 7
#define IPADDR "192.168.0.177" //IP Address of the Arduino Server
#define PORT 54321 //IP port of the server

AF_XPort xport = AF_XPort(XPORT_RXPIN, XPORT_TXPIN, XPORT_RESETPIN, XPORT_DTRPIN, XPORT_RTSPIN, XPORT_CTSPIN);

uint8_t ret; //The return variable needs to be formated as a unsigned integer of length 8 bits 
int Xval = 0;
int Yval = 0;
int Xservo = 0;
int Yservo = 0;
int buttonPin = 11;
int buttonWas = 0;
int buttonIs = 1;
int ledState = 0; //I believe these are actually flipped 0 = On 1 = off
int ledPin = 13;
boolean ConnectState = false;
char linebuffer[16]; //Very small line buffer because we just need the X-Y readings.
Servo Xservobj;
Servo Yservobj;
int loopCount = 0;

//===============Setup pins, servo, xport ==========//
void setup()  
{
 pinMode(buttonPin, INPUT);
 pinMode(ledPin, OUTPUT);
 Serial.begin(9600);
 xport.begin(9600);
 delay(300);
 Serial.println("Finished Setup...");
 Xservobj.attach(9);
 Yservobj.attach(8);
 buttonIs = digitalRead(buttonPin);
}

//===============Functions===================//

void getButton() { 
  buttonWas = buttonIs; // Set the old state of the button to be the current state since we're creating a new current state. 
  buttonIs = digitalRead(buttonPin); //Read the buttong state.
}

void errorBlink(){ //Flash 4 times for an error
     for (int x=0; x <=3; x++){  
   digitalWrite(ledPin, HIGH);  
    delay(100);  
    digitalWrite(ledPin,LOW);  
    delay(100);  
   }  
}

char * resetXport(){ //Handles the regular reset of the Xport, returns reset errors
        ret = xport.reset();
       switch (ret) {
          case  ERROR_TIMEDOUT: {
           Serial.println("Timed out on reset!");
           errorBlink();
         return 0;
      }
      case ERROR_BADRESP:  {
         Serial.println("Bad response on reset!");
         errorBlink();
         return 0;
    }
  case ERROR_NONE: {
     Serial.println("Reset OK!");
     break;
    }
    default:
      Serial.println("Unknown error");
      errorBlink();
      return 0;
       }
  delay(250);
}


char * ConnectToggle(){ //This function turns the connection on or off
  
  if (ledState == 1){ //if the LED is off, then the client is not connected.
  resetXport(); //run the reset function
  ret = xport.connect(IPADDR, PORT);
  switch (ret) { //swtich case handles various error states
    case  ERROR_TIMEDOUT: {
     Serial.println("Timed out on connect");
      ConnectState = false;
      errorBlink();
     return 0;
  }
  case ERROR_BADRESP:  {
     Serial.println("Failed to connect");
      ConnectState = false;
      loopCount++;
      Serial.print("Loop count =");
      Serial.println(loopCount);
      ConnectToggle();
      if (loopCount >  2){  //For reasons I have not been able to figure out, it usually takes two tries to connect    
         errorBlink();
         ConnectState = false;
         break;
  }
  }
  case ERROR_NONE: {
    Serial.println("Connected..."); 
    ConnectState = true;
    Serial.println(ConnectState);
    digitalWrite(ledPin, HIGH);
    ledState = 0;
    loopCount = 0;
    break;
  }
  default:
    Serial.println("Unknown error");
     ConnectState = false;
     errorBlink();
    return 0;
 }
 }
  else { //Toggle off connection
    ledState = 1;
    digitalWrite(ledPin, LOW); //turn OFF the LED
    xport.println("x"); //Send the x command that kills the session.
    delay(100); 
    xport.disconnect(); 
    Serial.println("Disconnected.");
    ConnectState = false;
  }
}

void fetchStuff() { //Gets the linebuffer
   xport.flush(100);
   xport.println("g"); 
   ret=xport.readline_timeout(linebuffer, 16, 200); // get first line
   while(ret!=0){
     ret=xport.readline_timeout(linebuffer,16,200);
  }
}

void moveServos(){ //Note that the server sends out the X, Y & Z values, but Z is not used. It could be.
   Xval = (((linebuffer[1] - 48) * 100) + ((linebuffer[2] - 48) * 10) + (linebuffer[3] - 48)); //Extract X value & convert the ASCII to integers
//  Serial.print("Xval:  ");
//  Serial.println(Xval, DEC); 
  
  Xservo = map(Xval, 275, 425, 0, 180); //Map the range of X values from the server to the servos
   Serial.print("Xservo:  ");
  Serial.println(Xservo, DEC);
  Xservobj.write(Xservo);
  delay(15);  
   
   Yval = (((linebuffer[5] - 48) * 100) + ((linebuffer[6] - 48) * 10) + (linebuffer[7] - 48));//Extract Y value & convert the ASCII to integers
//   Serial.print("Yval:  ");
//   Serial.println(Yval, DEC); 

  Yservo = map(Yval, 275, 425, 0, 180); //Map the range of Y values from the server to the servos
   Serial.print("Yservo:  ");
  Serial.println(Yservo, DEC);
  Yservobj.write(Yservo);
  delay(15);     
}
  
//==============Main loop==================//

void loop()   { // run over and over again

getButton(); //Run to check if button has been pressed.

if((buttonIs == 1) && (buttonWas == 0)){
  ConnectToggle(); //If there is a change in the button state, toggle the connection on or off.
}

if (ConnectState == true){ //If the client is connected, do some work!!
  fetchStuff();
  moveServos();
  }
}

Further work
The system needs a way to detect dropped connections - possibly using "millis()" to determine if a response or query has taken too long. As well, I really should smooth out those analog readings so the servos don't jitter! As well, I might just build a motion ase of some sort to hook up to the servos so they can do something slightly more cool that just flap their arms.
So, that's my first Arduino project in a few months! Thanks for the comments and questions. The site has apparently had over 11,000 hits, which completely amazes me. Please keep the comments and suggestions coming. I think next up will be another Chinese knock-off phone review.


Tuesday, September 8, 2009

Further on the POP3 email checker

Well, since this project has been a bit of a surpirse hit, I thought I would include a few further notes and refinements.

This is a small change to the updateClient function that just flashes the LED rapidly four times to indicate the network is down:


void updateClient() //This function contacts the POP3 server
{
if ((millis() - updateTimer) > 5000)
{
Ethernet.begin(mac, ip);
// Serial.println("connecting...");
delay(1000);
if (client.connect())
{
// Serial.println("connected");
client.println("user Pop.User"); //Insert your usual email login name
client.println("pass YourPassword"); //And your password here
client.println("quit");
client.println();
clientConnected = true;
}
else
{
// Serial.println("connection failed");
// Flash four time rapidly to indicate network down.
for (int x = 0; x < 4; x++){
digitalWrite(ledPin, HIGH);
delay(100);
digitalWrite(ledPin, LOW);
delay(100);
}
}
updateTimer = millis();
}
}


What is odd is that when I have tried this with another LED it blinks very dimly - even when I move around which digital pin the other LED is coming from. Very odd and I still haven't figured out what is causing that.

Another thing to watch for is that this assumes that the number of emails comes through in array position 106 & 107 (I then subtract 48 to make the ASCII code into an integer):


mailNum1 = inString[106] - 48; //Array position 106 contains the first digit
mailNum2 = inString[107] - 48; //Array position 107 contains the 2nd digit if it is available


This, of course, may vary depending on how many characters there are in your POP3 server name and so on. I would recommend starting with the basic commands for getting the POP3 string back:


#include <Ethernet.h>

byte mac[] = { 0xDE, 0xAD, 0xBE, 0xEF, 0xFE, 0xED };
byte ip[] = { 192,168,0,172 };
byte server[] = { XXX, XXX, XXX, XXX }; // IP address of your POP3 server

Client client(server, 110);

long updateTimer;
boolean clientConnected = false;

void setup()
{
Serial.begin(9600);
}

void loop()
{
updateClient();
checkAvail();
}

void updateClient()
{
if ((millis() - updateTimer) > 10000)
{
Ethernet.begin(mac, ip);
Serial.println("connecting...");
delay(1000);
if (client.connect())
{
Serial.println("connected");
client.println("user user.name"); //Insert your usual email login name
client.println("pass YourEmailPassword"); //And your password here
client.println("quit");
client.println();
clientConnected = true;
}
else
{
Serial.println("connection failed");
}
updateTimer = millis();
}
}

void checkAvail()
{
if (clientConnected)
{
if (client.available())
{
char c = client.read();
Serial.print(c);
}
if (!client.connected())
{
Serial.println();
Serial.println("disconnecting.");
client.stop();
clientConnected = false;
}
}
}


Then watching the output in the serial window, which will look something like:


connecting...
connected
+OK hello from popgate 2.43 on pop108.xxx.xxx.xxx.xxx.xxx
+OK password required.
+OK maildrop ready, 0 messages (0 octets) (16335883)
+OK server signing off.

disconnecting.


You can then use this output to figure out the right position in the array for mailNum1 & mailNum2.

Hope that helps someone out there. It has been very flattering to see how many folks are interested in building this for themselves. As I explained in the first post, once you have the raw number of emails as an integer you can process with Arduino, you can do all sorts of interesting things beyond just flashing and LED!